
Wheel bearings allow the wheels to rotate smoothly while supporting the vehicle’s weight. When a wheel bearing starts to fail, you may hear a humming, roaring, or grinding noise that gets louder or changes as your speed increases. You might also notice excessive wheel play, vibrations, or an illuminated ABS warning light.
What Is a Wheel Hub?
What is a wheel hub? Learn what a wheel hub does, how it works, its main components and types, and how it differs from a wheel bearing and hub assembly.
Read More
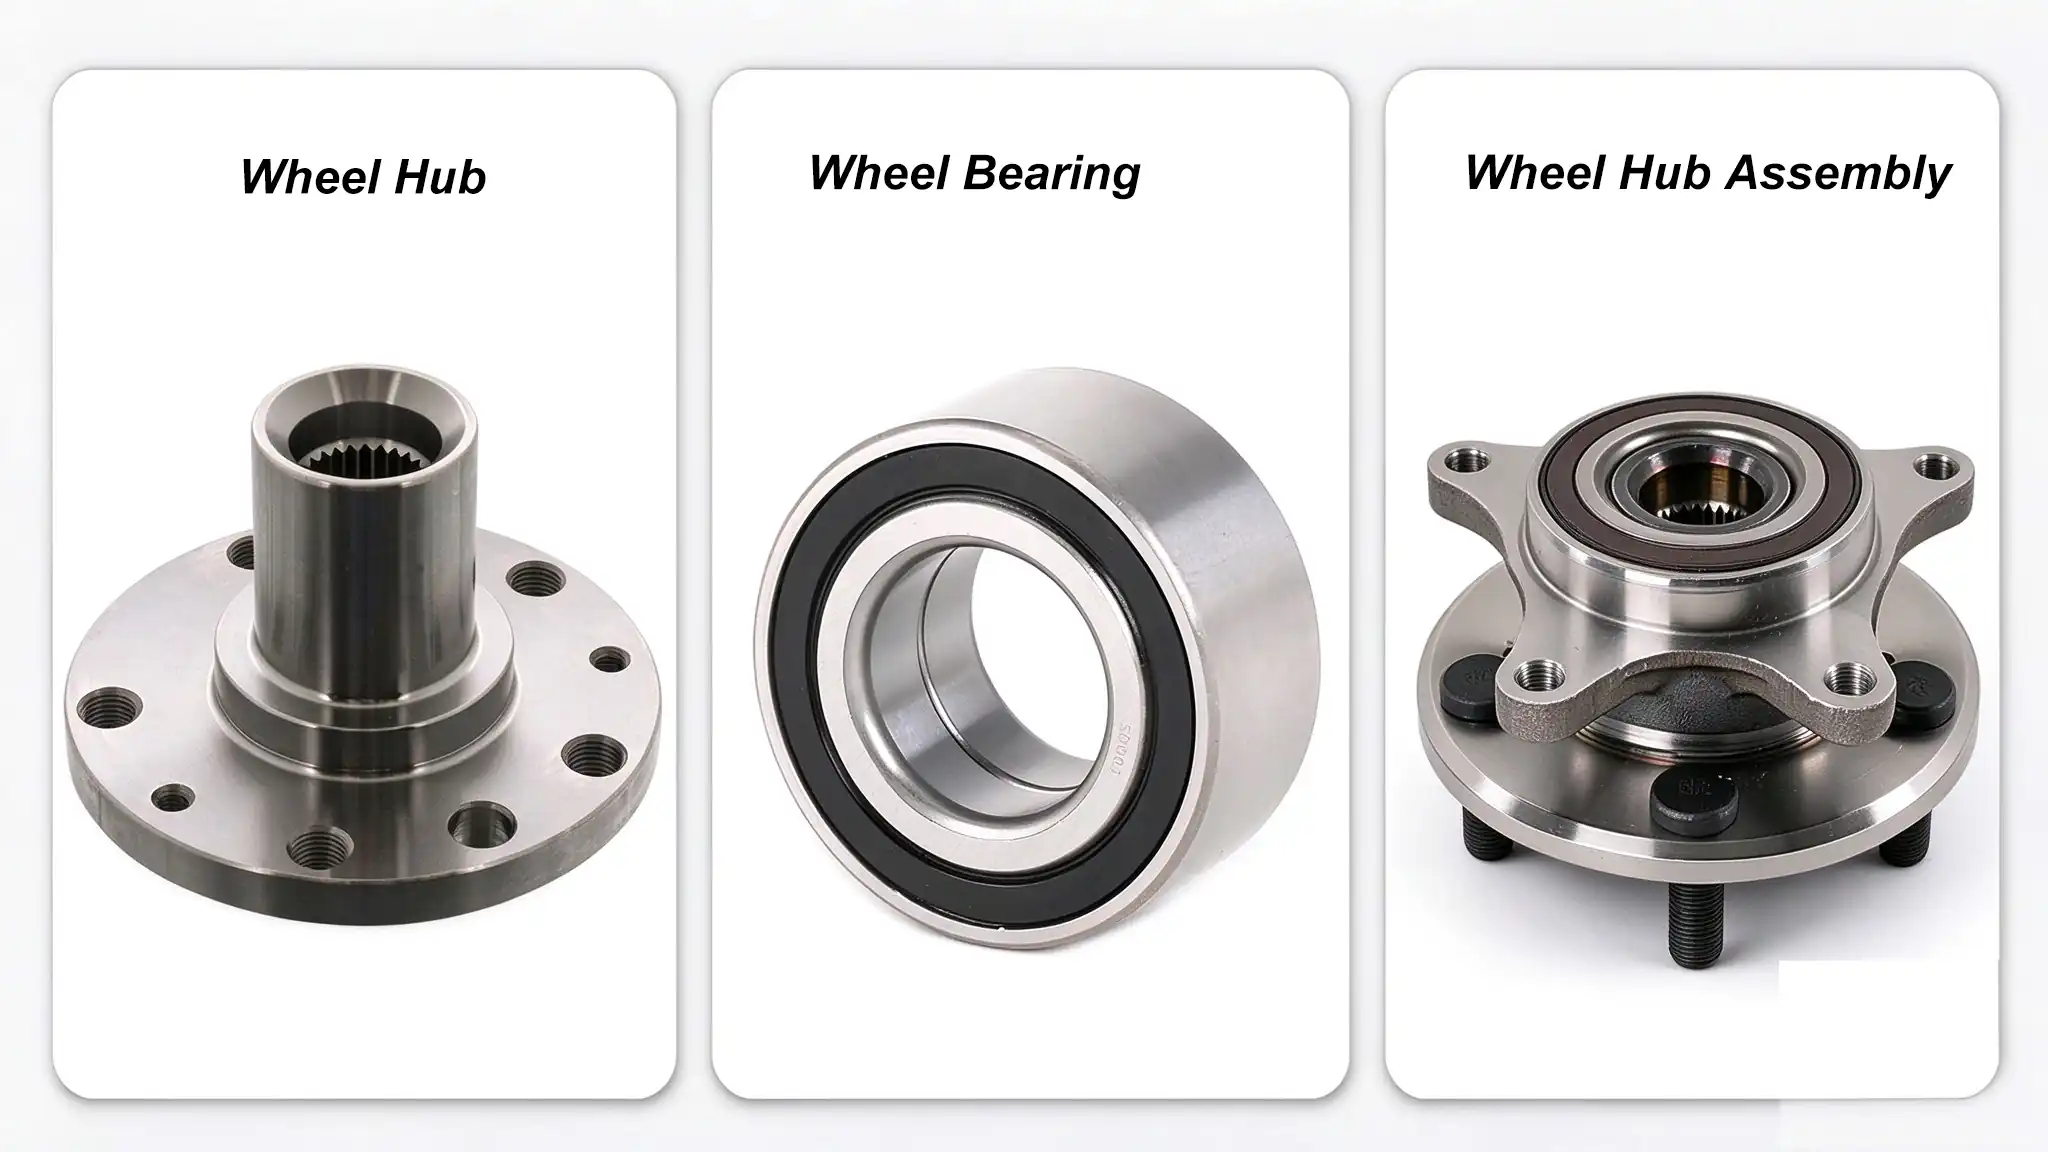
Different Types of Wheel Bearings and How to Replace Them
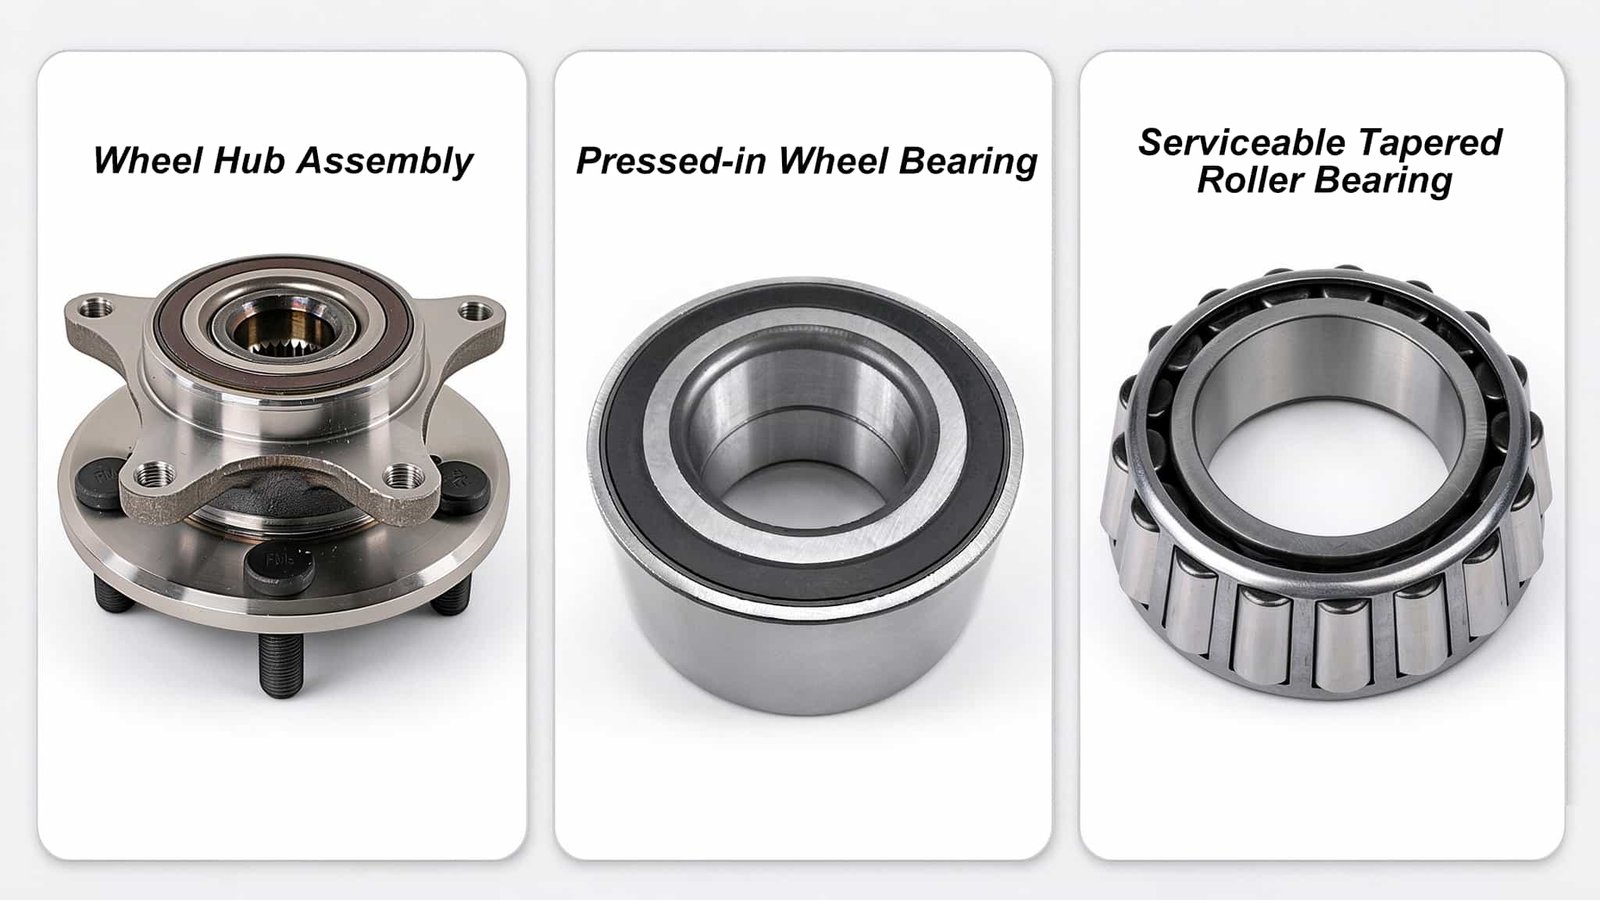
Wheel bearing designs and replacement procedures vary by vehicle. In general, wheel bearings fall into three common categories based on their design and service requirements: wheel hub and bearing assemblies, press-in wheel bearings, and serviceable tapered roller bearings that can be disassembled, cleaned, inspected, and repacked with grease.
01.
Wheel Hub Assembly
A wheel hub and bearing assembly integrates the bearing, hub flange, and other components into a single unit. It typically features a sealed design, eliminating the need for regular disassembly or greasing. If the bearing fails, the entire assembly usually needs to be replaced. Some assemblies also incorporate a wheel speed sensor or magnetic encoder, depending on the vehicle’s design.
02.
Pressed-in Wheel Bearing
Press-in wheel bearings are typically installed in the steering knuckle or a dedicated bearing housing using an interference fit. Some designs also use a retaining ring to secure the bearing. Replacing the bearing requires a bearing press or specialized tools to remove the old bearing and install the new one. Applying force to the appropriate bearing race during installation is essential to prevent damage to the bearing, steering knuckle, or hub flange.
03.
Serviceable Tapered Roller Bearing
Serviceable tapered roller bearings are commonly found in some older vehicles, trailers, and vehicles with specific hub designs. They typically consist of inner and outer tapered roller bearings, matching bearing races, seals, and retaining hardware. These bearings can be disassembled, cleaned, inspected, and repacked with grease according to the manufacturer’s recommendations. During reinstallation, the bearing preload or endplay must be adjusted to specification to prevent overheating, premature wear, or excessive play.
How Much Does It Cost to Replace a Wheel Bearing?
Learn the cost to replace a wheel bearing, including parts and labor, key factors that affect the price, and how to tell if a repair quote is fair.
Read More
Step-by-Step Guide to Replace A Wheel Bearing
01.
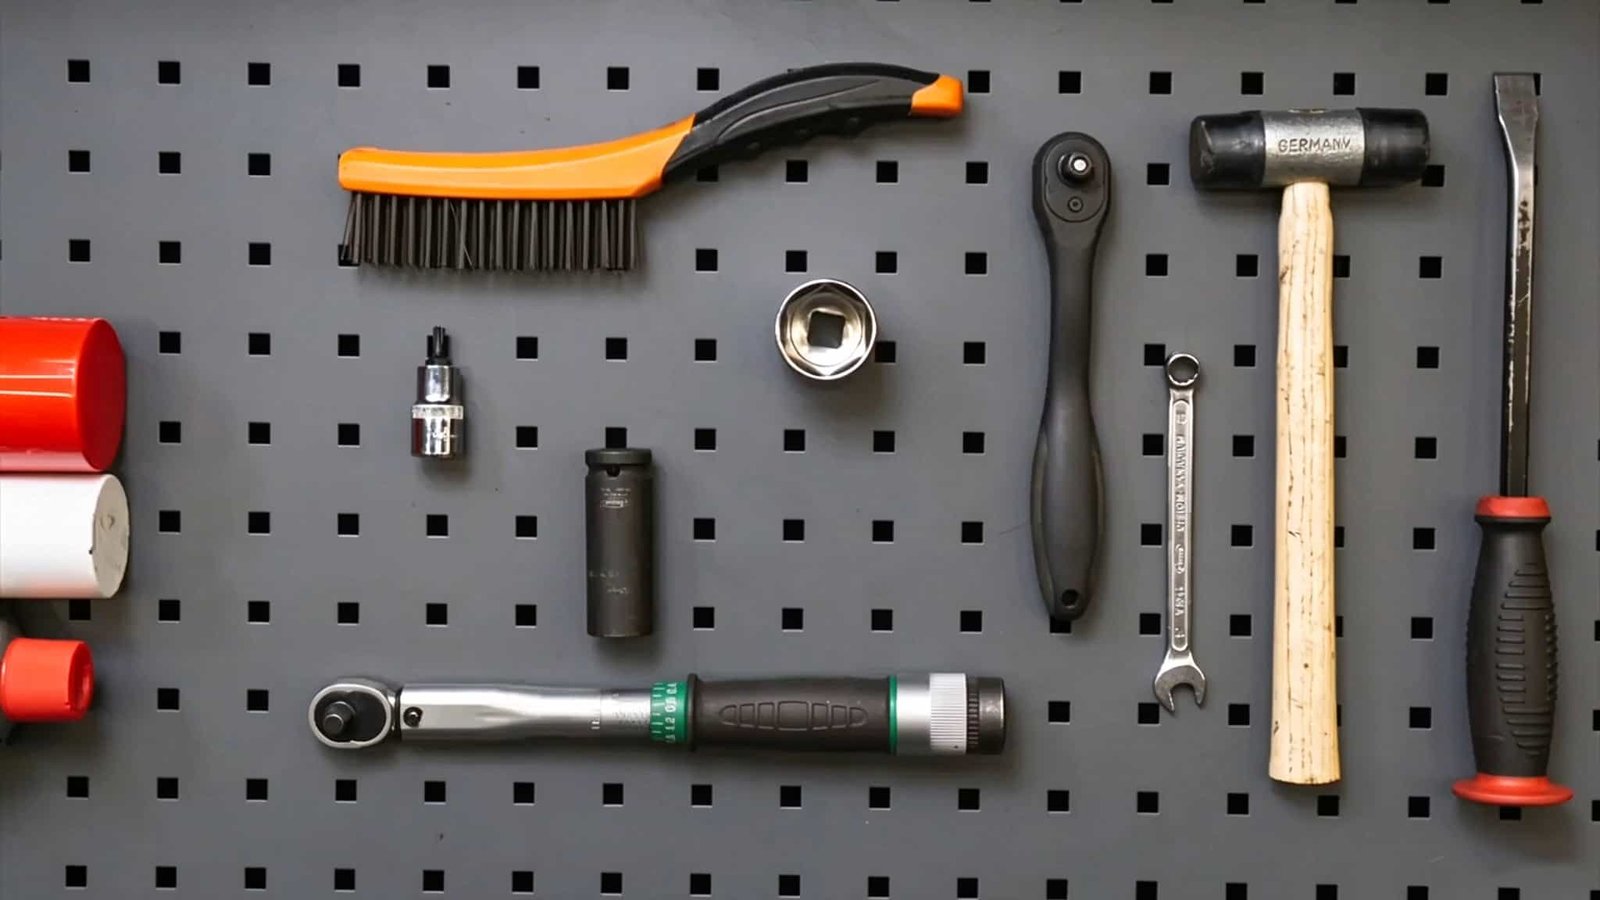
Tools Required for Wheel Bearing Replacement
Before you start, make sure you have the basic tools on hand, including a socket set, ratchet wrench, torque wrench, breaker bar, jack, jack stands, wheel chocks, wire brush, and hammer. Depending on your vehicle’s design and the type of wheel bearing, you may also need an axle nut socket, hub puller, bearing press, snap-ring pliers, tap wrench, Torx bit T30, 32 mm drive socket, or 17 mm wheel impact socket. Cleaning and lubrication supplies, such as WD-40 spray, all-purpose cleaning spray, and copper grease, may also be needed for certain vehicles and repair steps.
02.
Prepare the Vehicle for Repair
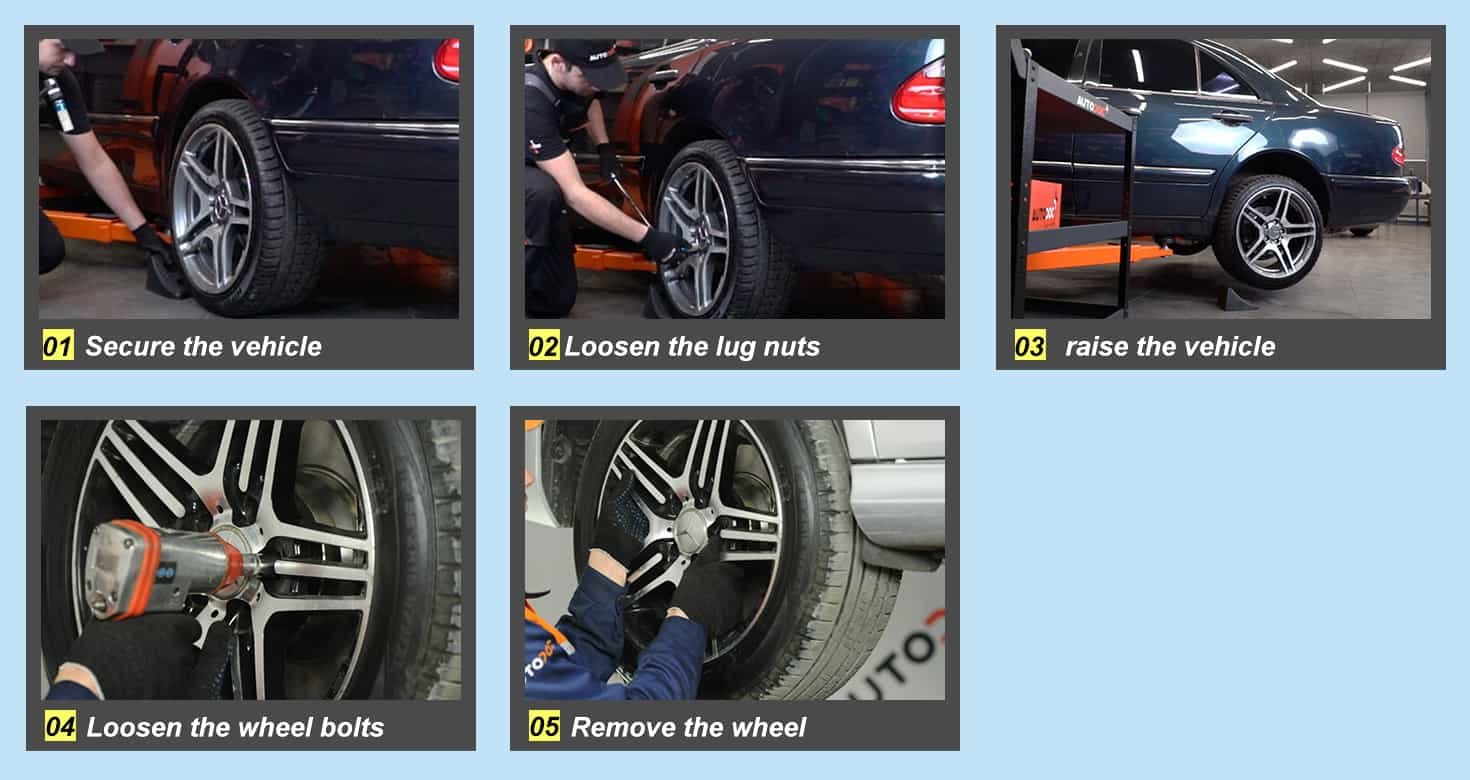
Park the vehicle on a firm, level surface, apply the parking brake, and place wheel chocks to prevent movement. With the wheels still on the ground, loosen the lug nuts or wheel bolts slightly. Then use a jack at the manufacturer-designated lifting points to raise the vehicle and support it securely with jack stands. Once the vehicle is safely supported, remove the wheel.
03.
Remove the Wheel and Brake Components
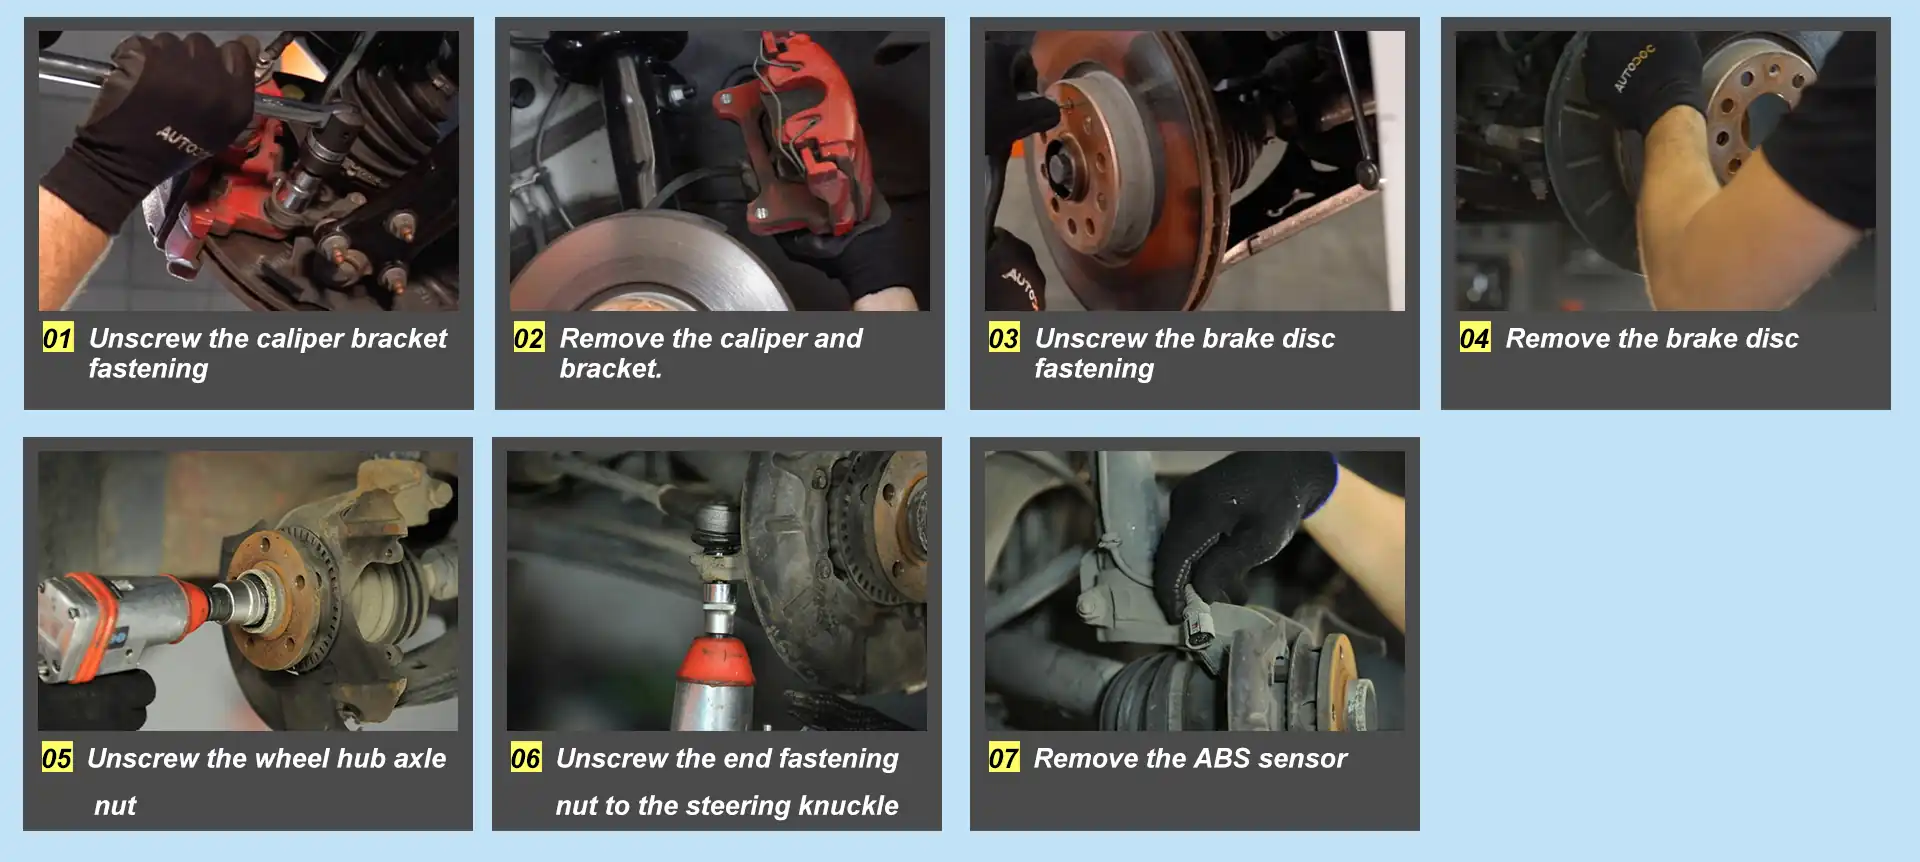
Once the lug nuts are loosened and the vehicle is safely raised and supported, remove the wheel, brake caliper, and brake rotor. If the rotor is stuck due to corrosion, use the appropriate tools to remove it carefully without damaging nearby components.
04.
Disconnect the ABS Wheel Speed Sensor
Locate the ABS wheel speed sensor and its wiring near the wheel hub, then disconnect the electrical connector. If necessary, remove the sensor and its mounting fasteners to prevent damage during disassembly and reassembly.
05.
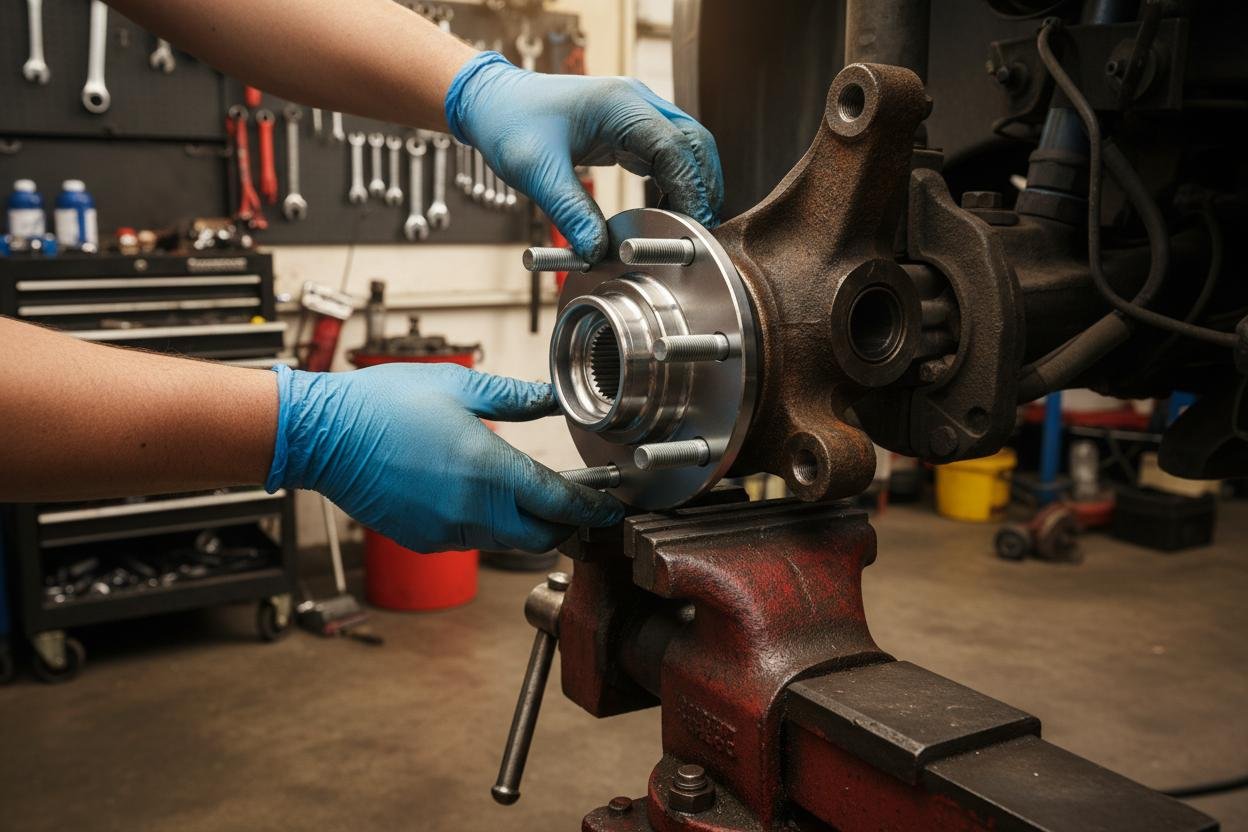
Replacing a Wheel Hub and Bearing Assembly
Remove the mounting bolts and take out the old hub and bearing assembly. Clean and inspect the mounting surface, then verify that the replacement assembly matches the original in fitment, dimensions, and sensor configuration. Align the new assembly correctly and install the mounting bolts, tightening them to the manufacturer’s specified torque.
06.
Replacing a Press-In Wheel Bearing
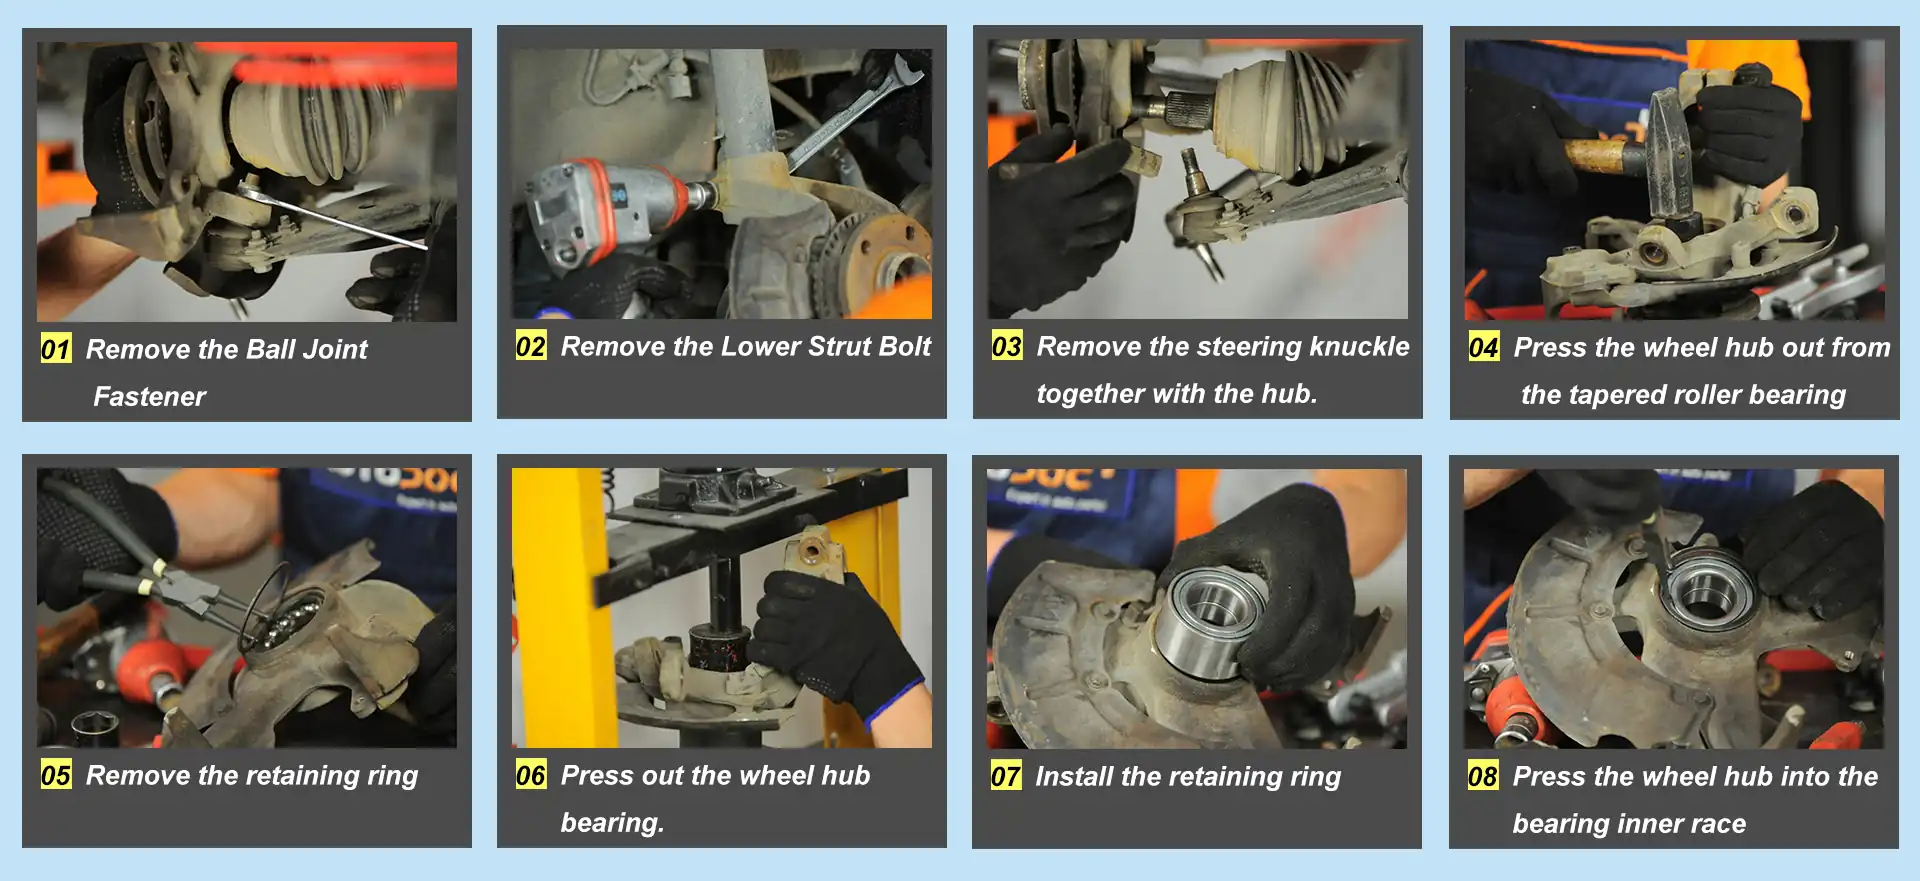
Follow the manufacturer’s procedure to remove any retaining rings or other fasteners in the correct order. Use a bearing press or specialized tools to separate the hub flange from the old bearing, then press the bearing out of the steering knuckle or bearing housing. Clean and inspect the bearing bore and hub flange for wear or damage. Align the new bearing with the bore and press it into place, applying force to the appropriate bearing race as specified by the manufacturer. Reinstall the retaining ring and any other required fasteners. Avoid applying installation force through the rolling elements, as this can damage the bearing.
07.
Replacing Serviceable Tapered Roller Bearings
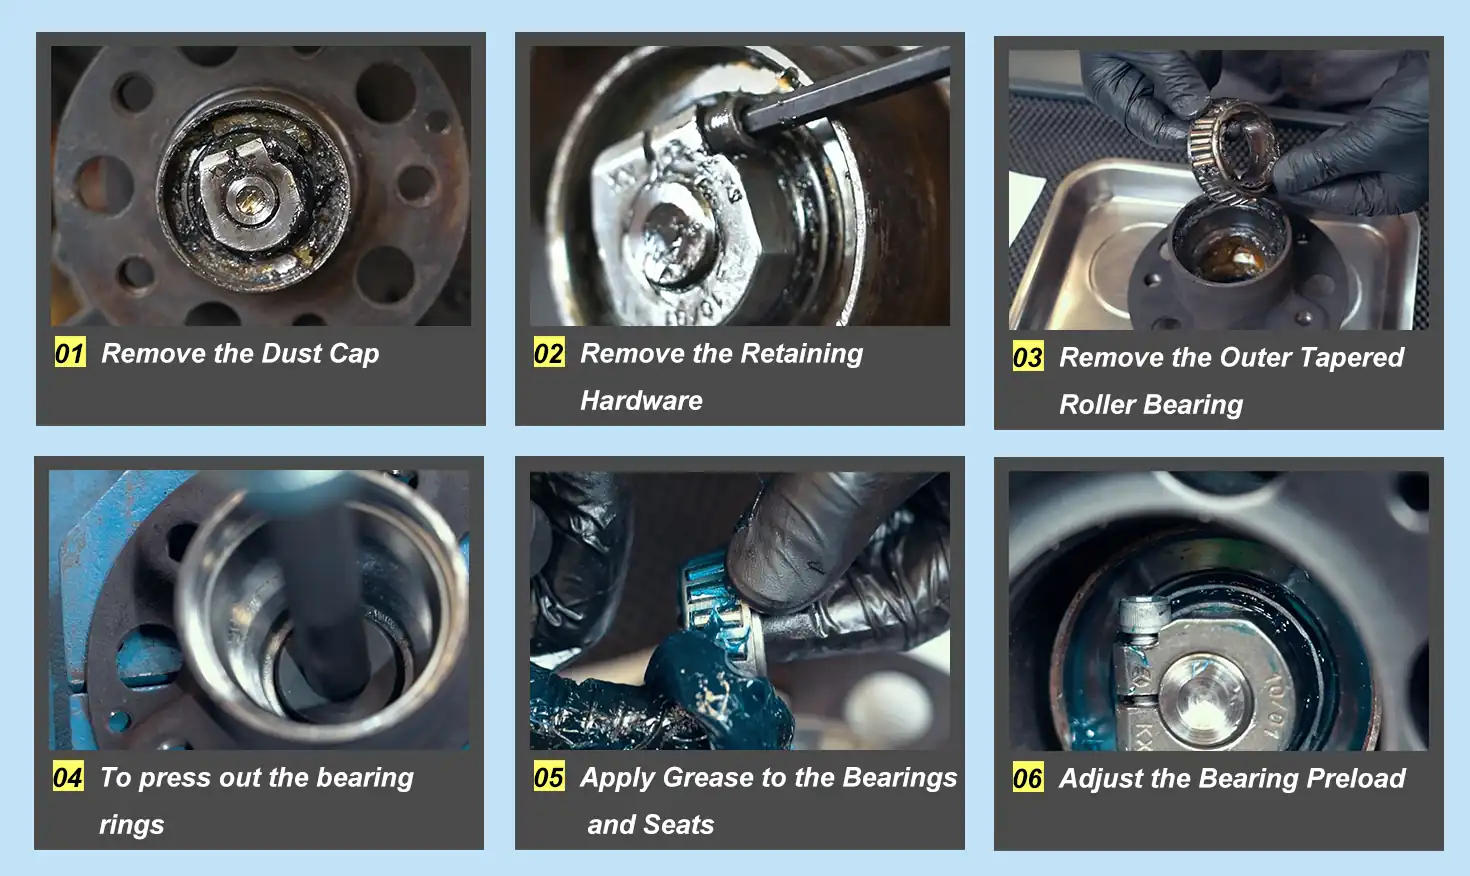
Serviceable tapered roller wheel bearings typically consist of two separate bearings, an inner bearing and an outer bearing, each seated in its corresponding position within the hub. In common designs, the inner bearing is protected by an oil seal, while the outer bearing is covered by a dust cap. Once removed, the bearings can be cleaned, inspected, and repacked with grease. Individual bearings can also be replaced if they show signs of wear or damage.
Final Checks and Maintenance Tips
After replacing the wheel bearing, check that all removed components are properly reinstalled and tightened to the specified torque. Make sure the ABS wheel speed sensor and its wiring are securely connected. Once everything is reassembled, take the vehicle for a low-speed test drive and listen for unusual noises, check for vibrations or excessive wheel play, and watch for braking problems or an illuminated ABS warning light. If anything seems abnormal, stop driving and have the vehicle inspected before continuing.
To help extend wheel bearing life, avoid overloading the vehicle and driving over potholes or rough roads at high speeds. Keep high-pressure water away from bearing seals to prevent damage. During routine maintenance, inspect accessible seals, dust caps, and surrounding components for damage or contamination. Also watch for warning signs such as unusual noises, excessive wheel play, or vibrations.